-
E-mail
215670945@qq.com
-
Phone
13520619555
- Address
Product Categories
- Geotextile testing instrument
- Non destructive testing instruments
- CA mortar experimental instrument
- Rock aggregate testing instrument
- Test instrument
- Mobile laboratory
- compression testing machine
- Hydraulic universal testing machine
- Steel strand testing machine
- Asphalt mixture testing instrument
- Cement testing instrument
- Concrete testing instrument
- Wall brick testing instrument
- Geotechnical testing equipment
Beijing Zhonghui Kexi Instrument Co., Ltd
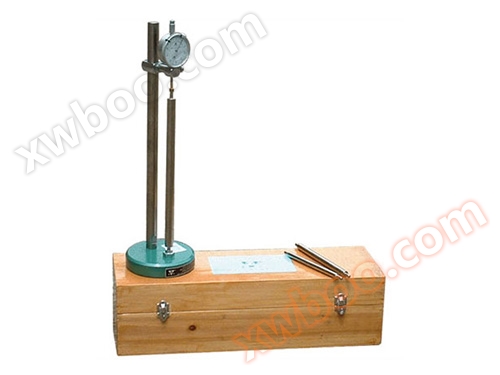
BC-300 cement sand ratio meter
NegotiableUpdate on 01/06
- Model
- Nature of the Manufacturer
- Producers
- Product Category
- Place of Origin
Overview
Wipe the test object clean, gently place the test object into the V-shaped groove of the upper and lower measuring heads and bracket of the length meter. The marked side of the actual test object is consistent with the relative position of the length meter during the last measurement, used to press the test object tightly, so that the upper and lower measuring heads are in contact with the test object measuring head. At this time, a set of numbers will appear on the dial indicator display window, which is the measurement value. The operator can use the function keys as needed.
Product Details
Detailed description:
BC-300 cement specific length meter parameter specifications and technical parameters:
1. Measurement range: 156-305mm
2. Standard rod length: 158 ± 0.2mm
176±0.2mm
300±0.2mm
3. Measuring instrument: dial gauge, digital micrometer
Range: 0-10mm 0-12.7mm
Accuracy: (division value) 0.01mm 0.001mm
4. Coaxiality between the upper and lower clamping holes and the support: < 0.25mm
5. Weight: Approximately 3.5Kg
6. Dimensions: (length x width x height) 122 x 100 x 450mm
BC-300 cement sand ratio meter [Instructions for use]
1. Place the length gauge on a flat workbench, and then place the standard rod into the V-shaped groove of the gauge bracket and the upper and lower measuring heads according to the upper, lower, inner and outer markings. The method for calibrating the reference length is as follows:
Press the "mm/in" button to make the display window symbol mm, press the standard rod with your fingers to make contact with the upper and lower measuring heads and the V-shaped groove of the bracket. At this point, a set of data will appear on the dial gauge display window. Then press the "ZERO" button, and all the numbers on the display window will be zero. Gently lift the dial gauge measuring rod, remove the standard rod, and complete the calibration. Note that during each calibration, the side of the standard pole with the label should be facing upwards or outwards, and the relative position with the length meter should be fixed.
2. Wipe the test object clean, gently place the test object into the V-shaped groove of the upper and lower measuring heads and bracket of the length meter. The marked side of the actual test object is consistent with the relative position of the length meter during the last measurement, used to press the test object tightly, so that the upper and lower measuring heads are in contact with the test object measuring head. At this time, a set of numbers will appear on the dial indicator display window, which is the measurement value. The operator can use the function keys as needed.